SOSET Help contents
Text Menu in Typeset
Font
Style
Size
(Auto-)Compression
Adjust equal Textlines
Linespacing
Vertical Justification
Vertical Centered
Y-Position
Alignment
Rotation
Tabulation
(Auto-) Whitespace
Autoline
Shaping Text
Make Lower
Make Upper
Color
To Logo
Margins
CAP (Computer Aided Proofreading)
Font
In the font-dialog box you choose: font, font-style, type, size and compression-factor
to change the appearance of your text. You may enter a test-text in the Sample field.
Shortcut: ![]() , Ctrl + F.
, Ctrl + F.
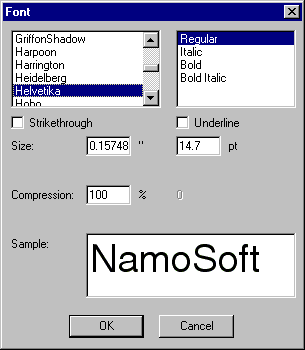
With the options Strikethrough and Underline you select extra options for displaying your font.
![]()
Style
Sets the selected or newly entered text style to Bold, Italic or underline
![]()
Size
The text size can be set in (real!) X-height (millimeters/inches) or graphical points in the Size option in the Text menu. Shortcut: Ctrl + S. The size is being displayed in mm's or inches and in pt's in the status bar on the left.
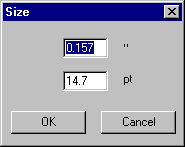
Read more about the unique Size option in the Font-size section of the Advanced SOSET Typeset Techniques. For precise information concerning the inches and millimeters conversion see Inch/Millimeter Conversion
![]()
Auto-Compression
If the text becomes longer than the stamp-margin settings, SOSET Typeset automatically compresses all characters in that line, so that they will fit.
In the status bar on the left you can see the percentage that indicates the compression factor. 100% means that your text is not compressed. As soon as your text is being compressed the percentage displayed becomes smaller. This happens automatically. You can set the compression factor manually as well. Determine the compression factor with the Compression option in the Text menu. Shortcut: Ctrl + C.
Note: This also counts for lines with tabulation, white space, but also during ASCII-text-import and numbering.
Auto-compression can be turned off in case you do not need or want compression. You can find this option in the Text menu of the main menu. A check mark indicates that the auto-compression is on.
This option is only available in the SOSET Typeset Gold version!
![]()
Adjust equal Textlines
All lines in a stamp with the same font-size will get the same (maximum) compression-factor after updating the stamp.
Eg.:
| Before updating: | After Updating: | |
| stamp line 1 | compression = 50%, size = 12 | compression = 50%, size = 12 |
| stamp line 2 | compression = 75%, size = 10 | compression = 75%, size = 10 |
| stamp line 3 | compression = 100%, size = 12 | compression = 50%, size = 12 |
In the above example stamp-line 1 and 3 have the same (font-) size but are set with
different compression. When the Adjust equal textlines is enabled,
stamp-line 3 will get the same compression as line 1 (because line 1 has a larger
compression-factor than line 3) when the stamp is updated.
Stamp-line 2 will stay unchanged because it has a different font-size than the other two
lines.
![]()
Linespacing
Choose linespacing to change the distance between lines. Shortcut: Ctrl + L
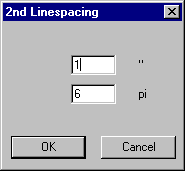
Enter several lines of text and try out various line spacing options, and see how the baselines are spaced in the stamp-design area.
As SOSET calculates the (very exact) size of a capital character in mm/inches, it initially sets the line spacing at the same size and each textline will have the previous line spacing. This makes that text exactly starts at the top of a stamp, which is very difficult to achieve with the uncontrollable point-size in other software. Especially for the design of accounting stamps and circular and oval stamps we receive very positive reactions to our approach.
In word-processors and DTP-software a character has a corps, which is 'flesh' above and below a character and that makes that characters automatically have a certain line spacing. This makes also that you never can start a text exactly at the top of a stamp and/or position a text exactly within a circular or accounting stamp.
We recommend using the DesignWizard and the text-line-spacing options to let SOSET suggest most of the line-spacing.
![]()
Vertical Justification
With this vertical linespacing-option you can (re)design your stamp. Shortcut: Ctrl +
V.
After entering the text in one or more textlines, you select Vertical justification
from the Text menu.
SOSET automatically centers the text over the height of your stamp. SOSET will spread unused line space over all selected lines to fill the size of the stamp with text. In case you design a stamp with a border, you can specify this option and SOSET will adjust its calculations to this situation.
![]()
Vertical Centered
You select text and this option, if you want to vertically center one or more textlines
in your stamp-design Shortcut: Ctrl + B.
You can vertically center every textline or textsegment separately. This option will
center all text-lines together in the middle of the stamp, without changing the
line-spacing between the lines in the design.
![]()
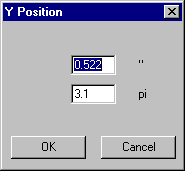
Y-Position
With the Y-position-option you can set a fixed Y-position for the selected textblock. Shortcut: Ctrl + Y
![]()
Alignment
With the alignment options you can select:
- Flush-left. Shortcut:
 , Ctrl
+ Shift + L
, Ctrl
+ Shift + L - Flush-right. Shortcut:
 ,
Ctrl +Shift + R
,
Ctrl +Shift + R - Center. Shortcut:
 , Ctrl +
Shift + C
, Ctrl +
Shift + C - Justified. Shortcut: Ctrl + Shift + J. With the Justified alignment option all unused space in a textline will be spread between the blank space in the selected textblock. Whitespace is displayed as a dotted gray line.
![]()
Rotation
With the Rotation option you can request a rotation from 0? to 360? of any
selected text segment. Shortcut: Ctrl + Alt + R.
Negative values will result in clockwise rotation and positive values will move your text
counter clockwise. The angle is always in relation to the horizontal axis of the stamp.
The result of rotation can be confusing!
Keep in mind that the length of the selected and rotated text is set to zero to avoid weird results.
To train yourself in this matter and to understand better what happens, you could start with left-aligning a textline.
Select the whole line or a textsegment in that line and set the Rotation-angle. The linespacing is now measured from the bottom of the rotated text.
![]()
Tabulation
With the Tabulation you can arrange text at a fixed position. Shortcut: Ctrl +
T.
The tabulation dialog shows a list of tabulations of all text segments in the current
design. You simply fill out the desired tabulation in the dialog.
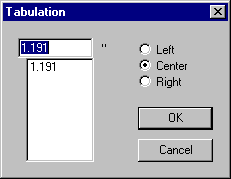
Any text segment can be moved to the next and previous tab by using respectively the Tab and Shift + Tab-key. You can select a text segment and subsequently move it tab-wise, or you can put the cursor in front of the text segment you wish to move. Tab-management is completely performed by SOSET Typeset.
Notice that the tabulation-option only affects the selected text segments and the current text segment. Your design as a whole is unaffected by tabulations.
The tabulation in SOSET Typeset is a very well considered approach, which is totally
differently from most word-processors and DTP-software; it offers strict positioning.
After a while you will experience its power and efficiency.
E.g. where a tab normally moves forward when entering more text, the SOSET tab remains
where it is. In this way new, modified and deleted tabs do not influence a stamp design.
Only columns defined in the DesignWizard will become tab-settings in all text-lines defined in the DesignWizard.
The tab-settings of the text-segment at the cursor-position are visible by the marginmarkers in the upper ruler (displayed as blue dotted lines). These markers can be dragged to change the active tab-settings.
The best way to work with tabulation in SOSET Typeset is to set a tab (choose the Tabulation command from the Text menu) then enter text and so on, instead of setting all tabs first. You can set all necessary tabulations in one or more lines. Per tabulation you can specify flush left, right or center.
![]()
(Auto-) Whitespace
White space:
With the Whitespace option you can set an open space at any place. A tab and a
white space can be recognized by a gray line. Shortcut: Ctrl + A.
Auto whitespace:
With the Auto whitespace command all unused space in a textline will be spread
between all characters in the selected textblock. Auto-whitespace is displayed as a dotted
gray line. Shortcut: Ctrl + W.
![]()
Autoline
The Autoline command enables you to fill a textline (from the position of the
cursor on) with a (dotted) line. Shortcut: Ctrl + H.
This linewidth is exactly one tenth of the font size. You can enter information concerning
the vertical alignment (on top of the textline, in the middle of the textline or at the
bottom of the textline) of the line.
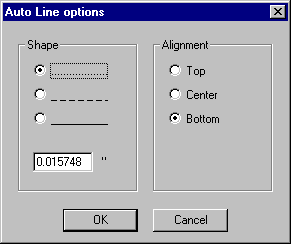
This autoline functions behaves as any other line object in SOSET Typeset. This means it can be edited in Line mode.
![]()
Shaping Text
The Shape submenu gives you the possibilities to shape you text.
- Straight textline. Shortcut:
 , Ctrl + Alt + S
 - Oval textline. Shortcut:
 , Ctrl + Alt + C
 - Flip text command enables you to switch between clockwise and counter clockwise typesetting in circular and oval textlines. For default the center of oval text is at the same position as the middle of the stamp.
- Parameters command edits the parameters of a circular textline in your stamp
design.
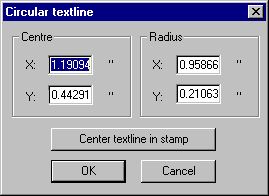
- It enables you to change the center coordinates (X,Y) and the radius (X,Y) of the circle of your selected text. In case of circular typesetting, you can center the selected textline in the stamp. You also can determine the center and the radius per textline.
Note: In circular and oval textline with clockwise typesetting the 0-position is at the bottom center of the stamp. "Flip" the textline will move the 0-position to the top center of the stamp.
Experience these changes with Alignment: flush left, center, right or justified.
Note: Changing the Linespacing and Y-position over the middle of the stamp will automatically flip the textline.
![]()
Make Lower
This Make lower option is meant to change the selected text segments from uppercase into lowercase.
![]()
Make Upper
This Make upper option is meant to change the selected text segments from lowercase to uppercase.
![]()
Color
You can use this option to determine the color of the text in the stampdesign. The
choices are black, white text (white text will be displayed in gray. You can use this
option to achieve reverse text.) or other. When the other box is checked you can choose
between 16 different colors. This option however is only available for SOSET Gold
versions.
You can also change the color of any object in a stamp with the color palet icon in the
lower taskbar in Typeset.
Note: For cutting with your flatbed laser engraver you set with this option the cutting areas.
![]()
To Logo
With this option you can change selected text-segments into a logo. This enables you to move and change the size of the text just as any other logo.
The To Logo command facilitates positioning and sizing of text.
![]()
Margins
With this option you can set the left and right margin of the text segments in your current selection. You can drag both margins with the mouse to any place you want (the marginmarkers are displayed in the rulers by a blue dotted line). This enables fitting text into different columns. You drag the left and the right margin respectively to the first and the last line of the column. Center the text in between the two boundaries (set by the margins).
![]()
CAP (Computer Aided Proofreading)
Function not implemented yet.
Available in SOSET typeset 4.1 and higher and SOSET quick typeset 4.0 and higher.
This option has been designed to offer the best possible way to do proofing. Intensive
research shows that double entry of text not only improves the quality of proofing but it
also takes less time.
Besides that it is much easier to concentrate on text-entry than doing
original proof-reading by reading and reading and getting more and more tired of that same
reading.
After the first entry a stamp can be found by another typesetter, using
search-information. The CAP-option opens the stamp-design and a memo-type screen for the second
entry. An OK will compare the two entries and will find possible errors. In that
case the typesetter is prompted to either accept the old entry, the new entry or to
correct the latest entry.
Next the text in the design is modified in accordance to the new entry.
![]()
Contact us in case you have any question or comment via our email