SOSET Help contents
Design a Stamp Manually
General
Typesetting
Positioning
of Graphical Objects
Selection
of Text and Objects
Move or
Change a Line
Move
or Change Graphical Objects
Move or
Change a Logo
More about Circular and Oval Typesetting
Rotation of Text
Advanced
SOSET Typeset Techniques
OpenType,
The Future Font Format
General Typesetting
Creating Text:
When you are in textmode, the T-button, ![]() on the Toolbar is highlighted and you press the Enter-key, you add a new textline to your stamp-design. This
textline contains by default the same font-information and
linespacing as the previously defined line. If it is the first
line in your stamp this textline is set in accordance to your
selections in the DesignWizard
or the Local
Preferences settings from the File menu. Before you enter the
text, it is recommended to set its attributes.
on the Toolbar is highlighted and you press the Enter-key, you add a new textline to your stamp-design. This
textline contains by default the same font-information and
linespacing as the previously defined line. If it is the first
line in your stamp this textline is set in accordance to your
selections in the DesignWizard
or the Local
Preferences settings from the File menu. Before you enter the
text, it is recommended to set its attributes.
Selecting Text.
Make sure you are in text-mode (the T-button, ![]() on the toolbar
should be highlighted). Position the mouse pointer in a text and
double-click to select that text-segment or drag (hold downing
the left mouse button) it to select the text you want to change.
on the toolbar
should be highlighted). Position the mouse pointer in a text and
double-click to select that text-segment or drag (hold downing
the left mouse button) it to select the text you want to change.
- Hold the Shift-key each time that you click and/or drag over more text segments you want to edit.
-- Or --
- Click outside the stamp-design area to select a complete text-line in one time. Position the pointer outside the working sheet in front of the text segments you want to select and click.
- Use Shift + click to select multiple textlines.
Once you have selected the text, you can edit it by typing over it; by deleting it, cutting, copying, or pasting it; or by changing its attributes.
Editing Text.
Make sure you are in text-mode, the T-button, ![]() on the left on
the Toolbar should be highlighted.
To enter text start typing at the cursor-position.
on the left on
the Toolbar should be highlighted.
To enter text start typing at the cursor-position.
With the mouse you can move to any place in a textline where you want, click once to start editing at that position.
You can use HOME, END, CURSOR and other position keys to simplify cursor-movement. CTRL + HOME deletes any text in the textline till where your cursor/mouse is positioned. CTRL + END deletes any text in the textline from where your cursor/mouse is positioned.
At any position in a text segment you can hit the Enter-key, which will result in a new textline with the same properties as the previous (not in DesignWizard, when the Enter-key is disabled).
Horizontal Positioning:
Its margins, its alignment, its spacing and its tabulation
determine the horizontal position of a text segment. You can find
the options in the Text menu and on the
Toolbar.
- The length of a text segment is determined by the Margin setting. You can drag the left and right margin marker or change the setting via the Margin command from the Text menu (margin makers are displayed as blue dotted lines in the upper- and left rulers).
- With the Alignment option you can select flush-left, flush-right, center or justified for text selections or choose the button on the toolbar (the current alignment is highlighted in the toolbar).
- With the White space command in the Text menu you can set an open space at any place. A white space can be recognized by a gray line. With this option you can modify the space between characters. Negative numbers move type closer together. In this way you can simulate kerning.
- With the Autowhite space option all unused space in a textline will be spread between all characters in the selected textblock. An autowhite space can be recognized by a dotted gray line.
- With the Tabulation option in the Text menu you can arrange text at a fixed position. The tabulation dialog shows a list of tabulations of all text segments in the current design. A tab can, as a whitespace, be recognized by a gray line. Any text segment can be moved to the next and previous tab by using respectively the Tab and Shift + Tab key
Tab-management:
Tab-management is completely done by SOSET Typeset.
Notice that the tabulation option only effects to selected text
segments and the current text segment. Only columns defined in
the DesignWizard will become
tab-settings in all text-lines defined in the DesignWizard.
The tab-settings of the text-segment at the cursor-position are visible by the marginmarkers in the upper ruler (displayed as blue dotted lines). These markers can be dragged to change the active tab-settings.
The best way to work with tabulation in SOSET Typeset is to set a tab (Choose Tabulation from the Text menu) and then enter text and so on, instead of setting all tabs first. You can set all necessary tabulations in one or more lines. Per tabulation you can specify flush left, right or center. The tabulation in SOSET Typeset is a very well considered and the approach is totally differently from most word-processors and DTP-software; it offers strict positioning. After a while you will experience its power and efficiency. E.g. where a tab normally moves forward when entering more text, the SOSET tab remains where it is. In this way new, modified and deleted tabs do not influence a stamp design.
Vertical positioning.
The vertical positioning of a text segment is
determined by its vertical justification, the vertical centered
option, linespacing and its y-position.
- Vertical justification automatically centers text over the height of your stamp. SOSET will spread unused linespace over all defined lines to fill the size of the stamp with text. In case your stamp has a border, you can specify this option and SOSET will adjust its calculations to this situation.
- The vertical centered option in the Text menu enables you to vertically center one or more selected textlines in your stamp design.
- With the linespacing
option you can set the distance between
text lines. Enter several lines of text and try out
various linespacing options, and see how the baselines
are spaced in the stamp design area. As SOSET calculates
the (very exact) size of a capital character in
mm/inches, it initially sets the line spacing at the same
size and each textline will have the previous line
spacing. This makes that text exactly starts at the top
of a stamp, which is very difficult to achieve with the
uncontrollable point-size in other software. Especially
for the design of accounting stamps and
circular and oval stamps we receive very positive
reactions to our approach.
We recommend using the DesignWizard and the text-line-spacing options to let SOSET suggest most of the line spacing.
Note: In word-processors and DTP-software a character has a corps, which is 'flesh' above and below a character and that makes that characters automatically have a certain line spacing. This makes also that you never can start a text exactly at the top of a stamp and/or position a text exactly within a circular or accounting stamp.
- With the Y-position option you can set a fixed Y-position for the selected textblock.
Arrow Keys.
With the arrow-up and arrow-down key you move from textblock
to textblock. Sometimes textblocks are beside each other so the
cursor down will result in a move to the right and the cursor up
in a move to the left.
![]()
Positioning of Graphical Objects
You can change linespacing or Y-position of any object by using the shortcut CTRL + Arrow up and down.
Notice that the object moves exactly along the predefined grid references set in the Local Preferences from the File Menu. The moves you make are being displayed on the right in the status bar.
As SOSET calculates the (very exact) size of a capital character in mm/inches, it initially sets the line spacing at the same size and each textline will have the previous line spacing. This makes that text exactly starts at the top of a stamp, which is very difficult to achieve with the uncontrollable point-size in other software. Especially for the design of accounting stamps and circular and oval stamps we receive very positive reactions to our approach.
Note In word-processors and DTP-software a character has a corps, which is 'flesh' above and below a character and that makes that characters automatically have a certain line-spacing. This makes also that you never can start a text exactly at the top of a stamp and/or position a text exactly within a circular or accounting stamp.
We recommend using the DesignWizard and the text-line-spacing options to let SOSET suggest most of the line spacing.
![]()
Selection of Text and Objects
You can select text and objects in your stamp design area, by
clicking the Selection button, ![]() on the Toolbar,
or by clicking the Selection option in the Mode submenu from the Properties menu. A selected
textsegment or object can be recognized by transparent
anchor points. These are transparent, so you can
position the selection perfectly, even in a small stamp-design.
on the Toolbar,
or by clicking the Selection option in the Mode submenu from the Properties menu. A selected
textsegment or object can be recognized by transparent
anchor points. These are transparent, so you can
position the selection perfectly, even in a small stamp-design.
While editing a stamp you can change the attributes of any graphical object in your stamp-design. Double-clicking the mouse or pressing the return-key opens the dialog of the current object you are pointing at. Now you can change the attributes of the selected object.
In SOSET Typeset you can work in two different modes. Sometimes it is easier to insert a graphical object by defining its coordinates. Or it is best that you insert a graphical object by drawing it with your pointing device.
Pressing a button on the toolbar will switch the current mode immediately to the requested mode. The appropriate mode button on the Toolbar will highlight.
Selection Mode.
In the selection mode you can create lines, boxes, circles
and import logo's using dialog boxes. Just make sure the
Selection button, ![]() on the toolbar is highlighted (so you are in
selection mode), and double-click in or outside your stamp
design. The dialog box that will appear depends on what graphical
object button,
on the toolbar is highlighted (so you are in
selection mode), and double-click in or outside your stamp
design. The dialog box that will appear depends on what graphical
object button, ![]() ,
, ![]() ,
,
![]() ,
, ![]() ,
, ![]() is
highlighted/selected. The appearing dialog box asks you whether
or not you want to add a graphical object, and if so you are
prompted to define its properties.
is
highlighted/selected. The appearing dialog box asks you whether
or not you want to add a graphical object, and if so you are
prompted to define its properties.
Default Mode.
If the selection mode is turned off, you can draw graphical
objects yourself in the default mode. The cursor-arrow changes in
a cross and by clicking the mouse and dragging it over the screen
(holding down the left mouse-button) you draw the desired object:
from starting point until end-position. It is not possible to
draw lines outside the defined stampsize.
Even when you are in Default mode you can open the dialog box by pressing the Insert-key or double-click in the design-screen to create a new object using dialog boxes.
When you are in text mode it is impossible to turn off the selection mode.
Note: Using the Toolbar is the fasted way the work but you can also view and change the Mode you're in by using the Mode submenu in the Properties Menu. The checkmark displays what mode you are currently in.
![]()
Move or Change a Line
When you select the Line button, ![]() in selection mode, the Selection button,
in selection mode, the Selection button, ![]() is
highlighted, you can put the mouse pointer at one of the ends,
hold down the left mouse-button and drag the line to another
position along the direction of the mouse. Then let go of the
mouse-button. The line has changed. You can change the length of
the line at the same time.
is
highlighted, you can put the mouse pointer at one of the ends,
hold down the left mouse-button and drag the line to another
position along the direction of the mouse. Then let go of the
mouse-button. The line has changed. You can change the length of
the line at the same time.
If you click any other position in the line (e.g. in the middle) you can move the line without changing the direction or the length of the line.
Another way to change a line is by double-clicking the line or pressing the Enter-key after you have selected the line (the anchors are visible). In order to do so, you should be in line-mode. A dialog box appears, called: Change line.

You can change the coordinates and properties of the line in this dialog box.
Dialog box options.
- Start Position gives the begin-point coordinates from the line (you can change the ruler units with the Local Preferences in the File menu).
- End Position gives the end-point coordinates from the line.
- Repeat enables you to repeat the graphical object
a number of times.
You have to specify the distance (Shift X and Shift Y) between the repeating objects. - Line specifies the width, caps, color, style and
dash for the line.
With the color option you can select Cutting color.
The Lasercutting color can by customized in Local Preferences in the File menu.
Any line with this option is used by the laser engraver as a cutting line.
This way you can add or edit cutting lines generated by SOSET (with the Lasercut command in the Edit menu).
Note: The grid (specified in the Local Preferences from the File menu helps you to position the object very well.
The
object moves exactly along the predefined grid references.
The moves you make are being displayed on the right in the status
bar (you can move a line by using the Ctrl + arrow shortcut. See Positioning of Graphical Objects for more information).
![]()
Move or Change Graphical Objects
When you select the Box button, ![]() , Circle button,
, Circle button, ![]() or Curve
button,
or Curve
button, ![]() when
you are in selection mode (the Selection button,
when
you are in selection mode (the Selection button, ![]() is
highlighted), you can move or modify the selected object. You
simply click at one of the borders or selection objects and drag
the object with the mouse to another position. This way you can
change the size of the selected object at the same time.
is
highlighted), you can move or modify the selected object. You
simply click at one of the borders or selection objects and drag
the object with the mouse to another position. This way you can
change the size of the selected object at the same time.
If you click any other position in the object (e.g. the middle of a line) you can move the object without changing the direction of the object.
Another way to change a graphical object is by double-clicking the object to change (or pressing the Enter-key). In order to do so, you should be in the graphical object-mode. A dialog box appears, called: Change ...(Box, Circle, Oval or Logo).

You can change the coordinates and properties of the object in this dialog box (the options in the Change Box dialog box and Change Curve dialog box are the same as the options displayed in this dialog box).
Dialog box options:
- Position gives the center-point coordinates from
the box, oval or curve.
With the options Left, Center and Bottom you specify the coordinates origin. - Size gives the size the Box/Oval/Curve
- Repeat enables you to repeat the graphical object
a number of times.
You have to specify the distance (Shift X and Shift Y) between the repeating objects. - Line specifies the style, color, width and dash
for the line used to draw the graphical object.
The Inside coordinates box is a special feature for objects that have the same size as the stamp itself.
If you mark this box the object-line will be placed completely inside the stamp-area.
If not marked the center-line of the object-line will be placed on the bother of the stamp so a part of the line will be outside the stamp-area.
See Figure 5 The effect of the Inside Coordinates box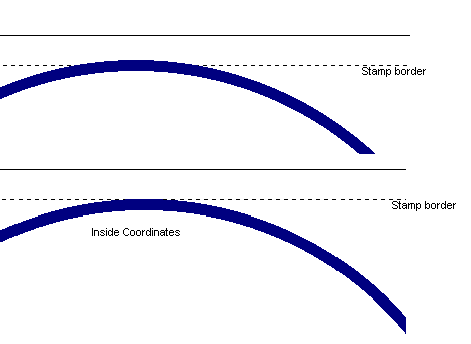
The effect of the Inside Coordinates box
- Fill enables you to fill an object (in black or white). This is particularly useful in case of accounting stamps with a filled space. This option is available for boxes, circles and curves.
- Center Box/Oval/Curve in Stamp places the object in the center of the stamp-area.
Note: The grid specified in the Local Preferences from the File menu helps you to position the object accurately. The object moves exactly along the predefined grid references. The moves you make are being displayed on the right in the status bar (you can move an object with the arrow-buttons.
![]()
Move or Change a Logo
When you select the Logo button, ![]() when you are in selection mode (the
Selection button,
when you are in selection mode (the
Selection button, ![]() is highlighted), you can add, move or modify a logo.
is highlighted), you can add, move or modify a logo.
SOSET Typeset supports many import formats. However some rules must be followed to achieve proper logo handling.
- In some logo-scan-applications logos are by default saved with a background and appear in SOSET in the size of the background instead of the size of the logo. Try to change the size of the page to the size of the logo.
- Background coloring also causes problems when more than one logo is used in the same stamp and they must overlap. Turn off the background coloring or change the background coloring into transparent.
- Tests show the best results using logos in the WMF (Windows Metafile) format. You should include the so-called placable header when saving in WMF-format.
![]()
In the Logo dialog box you can browse to the logo picture you want insert. You can also specify the position, size and repeat option in this dialog box.
For the import filetypes see Import File Types
![]()
More about Circular and Oval Typesetting
With the Shape command
in the Text menu or the shaping text-buttons,![]() ,
, ![]() , on the Toolbar you can choose between a straight and round (oval) shape of the selected text. The flip
text button,
, on the Toolbar you can choose between a straight and round (oval) shape of the selected text. The flip
text button, ![]() enables you to switch between clock- or counter
clockwise typesetting in circular and oval textlines.
enables you to switch between clock- or counter
clockwise typesetting in circular and oval textlines.
Note: In circular and oval textline with clockwise
typesetting the 0-position is at the bottom center of the stamp.
"Flip" the textline will move the 0-position to the top
center of the stamp. Experience these changes with flush left,
center or right. Changing the linespacing or Y-position over the
middle of the stamp will automatically flip the textline.
SOSET Typeset offers circular and oval typesetting
using advanced screen techniques.
However some
computers need more time to perform the necessary heavy
calculations.
Avoid waiting by entering the text in straight
Typeset mode first and switch then to circular mode. SOSET will
perform the calculation for the whole text instead of redoing it
per entered character.
Note: For default the center of oval text is at the same position as the middle of the stamp. You can shape the oval text using the Ctrl + arrow keys. You can also select the oval text and move it around in the stamp area.
![]()
Rotation of Text
SOSET will set the length of rotated text automatically to zero to avoid confusing text-lengths and unwanted compression! However you can set the length with this option.
With the Rotation command in the Text menu you can request a rotation from 0? to 360? of any selected text segment. Negative values will result in clockwise rotation and positive values will move your text counter clockwise. The angle is always in relation to the horizontal axis of the stamp.
To train yourself in this matter and to understand better what
happens, you could start with left-aligning a textline.
Select
the whole line or a textsegment in that line and set the
rotation-angle. The linespacing is now measured from the bottom
of the rotated text.
![]()
Advanced SOSET Typeset Techniques
Font-size in SOSET Typeset.
The size of a font is generally measured in points; a point
is almost exactly 1/72 of an inch. 12 points equals 1 pica.
Point size originally measured the vertical length of the lead
slug that supported characters in printing shops.
Point
size only loosely refers to the size of the characters.
The
following example shows the font heights for the same letters in
different fonts at the same (entered) point-size:
 capital height
The point size does not limit the height or the width of the character; the characters can be either larger than, equal to, or smaller than the shoulder of the lead slug.
SOSET Typeset offers a unique way to select the size of a
character.
During typesetting SOSET Typeset scans the chosen font to find the exact
capital height.
In SOSET Typeset you enter the capital
height and in doing so all text in different fonts will have
exactly the same height.
 capital height
It is also an advantage that the use of the capital height of a character is easier to understand for most people than the typographical point-size.
For the experienced typesetter SOSET Typeset offers also point sizing-options.
Note: This technology requires the use of TrueType fonts.
![]()
OpenType, The Future Font Format
SOSET Typeset uses sophisticated techniques to enable WYSIWYG typesetting, including circular fonts and font compression.
Note: These techniques can only work with TrueType Fonts.
Be sure that the use of TrueType fonts is enabled in the Fonts-section of your Control Panel, however...
Good news about fonts from Microsoft and adobe.
Microsoft and Adobe will collaborate on the development of a
new universal font format that will combine TrueType
and Type 1. The new font format will be called 'OpenType'
and will handle the next generation of type for Windows.
![]()
Contact us in case you have any question or comment via our email