SOSET Help contents
File Menu in Typeset
Here you find the usual Windows-options. However you will NOT find options to Open, Save or Save as, for the database (file) management is completely performed by the SOSET system.
New records are automatically sorted into the database. You can find them in the database-tables immediately after updating the newly entered or corrected stamps in the Record menu.
New
Import
Export
Additional Information about SOSET-Import/Export Operations
Print
M&R Laser Engrave
Change Status
Global Preferences
Local Preferences
Hotkey
Typeface Overview
Send Message
New
This option gives you access to the SOSET Typeset Stamp-table. All stamps are stored in this database-table.
By starting SOSET Typeset, you automatically open the SOSET Stamp-table. This gives you a screen view at one stamp at a time. In case you want to work with more than one stamp at a time, you click the New command in File menu for every stamp you want to view.
By opening this database-table, you can view other stamps. This will enable you to switch to or work in more stamps at the same time. You can choose between two screens that overlap each other or that can be seen simultaneously next to each other. Just use the Window menu options: Cascade or Tile
In the SOSET Quick Typeset version you can choose from the Quick-Entry screen and the typesetting screen. The Quick-Entry screen enables you to import textlines in existing stamps, automatically stored in the database-table. However if you need to perform typesetting operations, you just click the typesetting screen-option in the New submenu of the File menu.
This option is only available in the SOSET Typeset Gold version!
![]()
Import
SOSET can import files in several formats.
This option is only available in the SOSET Typeset Gold version!
Import SOSET DOS:
SOSET provides a special import filter for SOSET DOS.
You can import data that is made in this SOSET DOS
format. This option can also be used for other order entry
systems, as long as you stick to this particular format. The
layout of the DOS-file is standardized and available to SOSET
customers. See Import Interface File Version 2.89 for details about this special
format.
Import SOSET Windows:
With this option you can import stampdata that has been
created on another (remote) station that uses SOSET
Windows-based software. This remote station exports the SOSET
data (with the Export SOSET Windows command
from the File menu), and you use the Import Soset Windows
command item to import the SOSET Windows data.
Note: In case you use the SOSET Windows Import option be sure that both the exported files (Stamp.dbf and Stamp.ftp) are copied to the same directory. You need both files in the same directory to be able to read the imported records correctly. Information concerning order entry and customer information is primarily stored in the table Stamp.dbf. In the table Stamp.ftp the information stored is mainly related to stamp design.
After selecting the database-files, a dialog appears on your
screen. On automatic request of SOSET you can assign a remote
customer-ID to a remote branch or customer,
who wants to import a Windows file in SOSET.
If you do not fill out the remote customer-ID, SOSET will simply
copy the customer-ID and the customer-information belonging to
the different stamps, as entered by the remote side.
However, you can rename the customer-ID by entering a
remote-customer-ID. SOSET moves each original customer-ID
of the imported stamps into the customer information field and
replaces all these different customer-ID with the remote
customer-ID. This way all imported stamps have the same
customer-ID, which facilitates for instance correct shipping and
invoicing to this remote customer.
Warning: If you do not fill out the remote customer-ID, SOSET will copy customer-ID and customer-information as entered by the remote side. This might cause problems if you want to ship and invoice the stamps to one and the same address (in this case the address of your customer!). SOSET will come with a message to warn you of this possibly confusing situation!
Import from ASCII or ANSI Textfiles:
In case you want to use texts from an ASCII- or
ANSI-data-file (e.g. provided by your customer) to create new
stamps, you should use here the Import ASCII/ANSI command.
The import option is also very helpful in case you have an order for multiple stamps that differ only in one stamp-textline (or more textlines). You can think here of simple stamps with the same style, but with different names.
It is important that the file you want to import is a so-called DOS-Text file, it may not contain any word processing commands. A DOS-Text file can be created with the help of a DOS-editor, like Edit.exe. All modern word-processors offer the option to save a file as DOS-text (and thus with the extension .TXT).
In this file you enter the text that you want on your stamp.
The first line is the (changing) text of the first stamp, the
second line is the (changing) text of the second stamp, and so
on.
In case two lines have to be changed in each stamp, you type
these two lines in succession in the textfile. So, you have to
enter text per stamp and not per line. Make sure
that the last textline of the textfile contains actual text. To
know this for sure, you can, while positioning your cursor behind
the last letter of the last textline in the file, press the
down-arrow key at the keyboard and delete the lines that are
redundant.
Further it is important to know what type of characters you have in your file. In case the file is made in any Windows-application than you will probably have an ANSI-type of file. Under DOS created files are ASCII-type of files.
IMPORTANT: there is a maximum of 990 stamps that can be created in one run, due to the fact that each ordernumber can only have 990 sub-records!
![]() Import
text from a .TXT file:
Import
text from a .TXT file:
- Create a template to which the texts
from the file will be added. You also can choose one of
the stamps in the SOSET database and duplicate and modify
its design. Keep in mind that textlines from your file
will be added to the end of any text-segment in the
stamp-design. During the import-session SOSET will copy
all properties of the template, including the
order-number. Only a rising item number is automatically
added to each new stamp. In case texts are too long,
SOSET will use auto-compression to make
the text fit in the stamp-size.
Important: the textlines in the template may NOT be empty. - You enter the order/stamp and have it displayed on your screen in SOSET Typeset. Then you select the Import ASCII/ANSI command from the File Menu. You open the appropriate textfile and click OK. SOSET will ask you if the file contains ASCII (or ANSI) information. Choose Yes or No.
- Then SOSET asks you whether the first textline in the stamp corresponds with the first textline in the TXT file. If so, choose Yes.
- If your template consists of more than one line, SOSET will prompt for every textline if it corresponds with a textline in the TXT file. Answer accordingly.
- SOSET then asks you whether the format should be adjusted (from the textfile to the stampdesign). Choose 'No' in case you have e.g. put a border around your stamp template. If your stamp only consists of plain text, you can choose Yes here.
- After these questions SOSET sums up the entered information. You can Cancel the import or you can click OK.
- SOSET will start importing text as soon as you have confirmed your answers to the above mentioned questions. Now you can start or finish typesetting the stamp.
- Notice that the partnumber of all the imported stamp is 000.
- If additional typesetting is necessary you finish designing the stamps as any other stamp.
- Now you must copy the first stamp with partnumber -000 into the stamp with partnumber -001. You then delete the stamp that you have copied. This in order to have a partnumber (or orderitemnumber) attached to the ordernumber. This facilitates adequate scanning the bar codes and retrieving the stamps in box. Now production of these stamps can start without delay.
Import Logo:
Enables you to import logos directly into a stamp. This
option works the same as the Import from ASCII or ANSI
Textfiles option accept that it import logos instead of
textlines. This means you can select more than one logo at the
same time.
![]() To
import logos to the following:
To
import logos to the following:
- Make and update a new (empty) stamp.
- Select the logos you want to import.
- Typeset will make a new stamp with partnumber 000 for every selected logos.
- After import you have to copy and past the first stamp, with partnumber 000 to the empty stamp. This way the new stamps will be included in the production process.
Import TOP:
SOSET provides a special import filter for Mindware's
TOP OrderEntry. This option can only be used when you
have Mindware's TOP OrderEntry managing you order execution and
you want to use its order-information including the design
information.
![]()
Export
SOSET Typeset can export stamps in .DBF (.FPT), in WMF-format and in TIFF-format:
This option is only available in the SOSET Typeset Gold version!
Export to Windows:
Exports stamps from your database to a SOSET Windows-export
file. You can export the current stamp to SOSET Windows. You can
also export stamp(s) on status to SOSET Windows.
This means that the export is done by typeset status.
You will be prompted to select a status and enter a path and
filename. SOSET will export all stamps with the specified status,
in case they have not yet been exported. A stamp can only be
exported ONCE. The exported file (in fact 2
files: Stamp.dbf and Stamp.fpt) can be imported in another SOSET
Typeset application.
You can reset exported stamps by unmarking the export
flag in the Properties
menu.
Note: To avoid overwriting existing stamps, please make sure that you have reserved a wide range of order-numbers.
Export to WMF:
Exports in the WMF-format which is a very popular standard in
Windows metafile style. Use this option also if
you want to import a SOSET stamp into another SOSET stamp, e.g. a
circular text within a straight stamp.
Export to TIFF:
Export in the TIFF-format which is a very popular bitmap
format. Use this option also if you want to import a
SOSET stamp into another SOSET stamp, e.g. circular text within a
straight stamp. In the appearing dialog box, you select the file
name to export. You also have to define the resolution, the scale
and whether the image should be in photographically negative or
mirrored. Click OK to start exporting the selected file.
![]()
Additional Information about SOSET-Import/ Export Operations
To avoid double order-numbers or overwriting existing order-numbers please make good appointments about the range of order-numbers used at remote and at host side. In order to get the same basic data (like products, colors, mounts etc.) on both sides you need to copy all databases from host-side to the SOSET-DATA directory in remote-side.
It is advised to copy Product.dbf (and belonging Product.fpt), Printset.dbf, Colour.dbf, Mount.dbf from time to time to the remote side in order for both sides to have the same up-to-date information. After copying please run the Reindex in NamoSys. Possibly you prefer similar preference settings for the remote and the host side. The best way to attain matching preference settings between the two operations is to check and adapt these to one another over the telephone.
![]()
This option is to enable printing the current stamp design to
your printer. Shortcut: ![]() , Ctrl + P.
, Ctrl + P.
Output includes stamp information and can be used as a proof
print for you and your customer. In order to print more stamps
and to have a page-layout made, you need to start the PageWizard program.
Users of SOSET Remote Typeset will see a gray background on their printed output, since they do not need production quality.
![]()
M&R Laser Engrave
Important: this option is only available in the M&R laser engraver version of the SOSET Typeset software.
Make sure that the laser engraver and its exhaust are installed correctly and ready to engrave stamps, signs or seals. Power-, speed- and shoulder-settings are specified in the Printset-table and can be adjusted per product-category in the Browse command of the NamoSys program.
Several settings are already defined during the SOSET setup, but a check and test is strongly recommended.
On the File menu you choose the
option M&R laser engraver or click on the
M&R button, ![]() in the Toolbar.
in the Toolbar.
If you are using am Universal Laser a printer
dialog will appear. Click on Options button to
get an overview of the laser settings. You can alter the settings
manually or you can load a previously saved setting file.
See the Universal Laser Manual for more information.
If you are using a Lmi Laser you will get a
dialog which displays the Engrave position. You
can enter the X- and Y-coordinate (upper left = 0,0) to define
the starting point of the laser engraver. The laser will start at
this position with the engraving of the current design. The
entered quantity does not have any effect to this procedure, as
this option will engrave the product only once. To engrave the
desired quantity you need to start laser engraving from within
the PageWizard program.
You will now get the SOSET SuperShoulder Driver
screen, which gives actual stamp data and informs you about the
laser engraving process.

![]()
Change Status
With this option you can change the status of one or more stamps in a very easy way.
Change status On Orderno and Partno will open the dialog box and shows all status-options.

The status of the entered order-numbers will be changed into the status you set here. In the field order-number you must enter the complete order-number, including the item number, in total 9 digits (no dash!). You will find these complete numbers on all run cards or forms provided by the SOSET system.
In the boxnumber field you can only enter data in case you have selected the In box status. Use this status-update as a preparation to the shipment. Every time a stamp or order-item is finished you read the order- and item-number from the run-card and the number on the box. SOSET will check if all items of this order have the In Box status and if so automatically update all items of this order from In Box to Ready to Ship.
SOSET will also help you to check the quantity per order-item. For instance, you have an order-item with a quantity more than 1. Every time that you have a part from the order ready for shipment and want to change the status into In box; you have to answer the question: "Part of this order-item is already in boxno., order-item completed?". This procedure guarantees the order to be complete before shipment. You can check the quantity until completed. After every entry SOSET will search for the order-number and if found shows the previous status and confirm a status-change. You can leave the update session by choosing the Cancel-option.
Change status On Order-number or Run-number will show a list of all the stamps with the selected order number or Run number. You can select one or more stamps in this list, by simply click the item. Clicking OK will show all status-options. Make your choice to change the Typeset Status of all earlier selected stamps.
Note: The status of stamps in PageWizard-procedures can not be changed, the change status procedure will warn, that in this case the status is NOT changed. Status change can be much more efficient and accurate if you use a (guntype) barcode scanner.
This option is only available in the SOSET Typeset Gold version!
![]()
Global Preferences
Global Preference settings are valid for ALL users working with the SOSET programs. Only applicable for multi-user version.
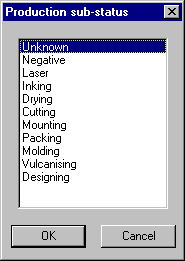
Specifies if you want to use the Production sub-status. If this option is marked every time a stamp gets the status In production a dialog will pop-up which lets you specify a sub-status.

Choose one of the following sub-status (you cannot add a new sub-status to this list):
Note: Changing of these settings will apply to future operations only.
![]()
Local Preferences
Set the local preferences to change the default settings in SOSET Typeset and customize Typeset to your own requirements. Each time you design a new stamp SOSET Typeset will start with these settings. However you can always change these settings for each stamp in its own design.
Local Preference settings are ONLY valid for the local user working with the SOSET programs.

- SOSET Data Path shows where all stamp-data is stored in your system. Make sure that in a network this directory is shared and all SOSET Typeset users have the same setting shown here. This path cannot be changed here. It is the first parameter of each SOSET program command-line.
- Ruler Units enable you to select inches or millimeters. For precise information concerning the inches and millimeters conversion see Inch/Millimeter Conversion.
- Default Stamp Size sets both the shape (straight, round or oval) and the size of the default stamp (width and height).
- Default Font selects your most used font in its inch/mm size or typographical point-size. For precise information concerning the inches and millimeters conversion see Inch/Millimeter Conversion
- Lasercutting color specifies the color for one or
more lines in a stamp, which will be recognized by a
laser-engraver as line(s), which must be cut out. You can
set the color to Red, Green or Blue or any blending of
these colors. You can enter a value from 0 to 255.
As soon as you set the cutting property of an object, the object will get this color to let the laser-engraver do the cutting of this object. - Default Text Settings specifies the following:
- Tabulation (always starting from the left side of the stamp)
- Whitespace sets the space between different characters or text segments, that can be used at any location in the text.
- Select one out of three available Alignment-options: Left, Center or Right to achieve respectively flush left, center or flush right of all text in the stamp.
- Auto-compression turned on, will automatically compress texts in case they are longer than the specified limits.
- Auto-linespacing will automatically changes the linespacing of (ONLY) the first line in a stamp-design, in case the size in that line has been changed.
- Default Graph Settings applies to the graphical
objects in the stamp-design. You can set the following:
- Default linewidth of all drawn lines.
- Dash specifies the relation between dash and gap.
- Boxwidth sets the default width of the lines of a box. Straight ends give lines straight ends, exactly between the (in the stamp-design) specified coordinates. Not selecting this option will result in rounded ends, partly outside the specified coordinates.
- Selecting Inside Coordinates will place boxes, ovals and curves exactly between the specified coordinates.
- Select Straight ends to give lines by default straight ends. If not selected lines will by default rounded ends.
- Select Rounded if you use boxes with rounded corners, Rx and Ry let you set the radius of these corners.
- With the Curveshape you set the default shape of curves. There are three available options: arc, chord and pie.
- Show Logos specifies whether or not logos are displayed as if or are represented by a rectangle.
- With Arabic/Hebrew Order you can choose the setting for text-entry from right to left instead of the default setting from left to right.
- The Grid setting enables you to
fix the cursor movement while moving objects in
your stamp-design. This facilitates designing
tremendously. The object moves exactly along the
predefined grid references. The moves you make
are displayed on the right in the status bar.
CTRL + Cursor moves the selected segment(s) in your stamp design exactly along the specified grid.
Using CTRL + SHIFT + Cursor, you move the selected segment(s) exactly one tenth (1/10) of the specified grid.
Because of difficult mathematical techniques it is easier to use the curve tool as the most preferred tool and check its settings (hit the return-key) enter these settings in the preferences.
- Print Options will prompt you to print an overview of imported/exported data after you exported or imported some stamps.
- Use hotkeys enables the list of hotkeys. The hotkey list is a global list and if you do not wish to use the hotkeys unmark this check box.
- Adjust equal textlines specifies whether or not the adjust equal textline option is by default enabled when setting a new stamp. See Text menu for more information.
- Undo steps. When you manually alter a
stamp, you can use the Undo command to
reverse the last change to a page. This number must lay
between 2 and 10.
Note: the larger the number the more memory Typeset needs. This can slow down the performance of your computer.
Output button:
When printing a stamp from typeset the following print-layout
options are available:

- Print title will print a title with information on all output.
- Print description will print the ordernumber, searchkeys, customer ID and status below the design
- Center Preprint will center the output on the page. In case you do not want to center your page-layout, you can enter here the X-coordinate and the Y-coordinate.
M & R button:
The M&R Settings are special laserengrave options to
enhance efficiency and speed.

You can select the following:
- Compress data
- Trim non engraved left and right sections skips empty space on a page during engraving.
- Environmental-friendly rastering skips non engraved sections.
- Speed up during non engraved areas.
- Lasercutting inside stamp area
- Don't lasercut corners prevents stamps from being completely cut-out. Stamps keep attached to the page by thin strips at the corners of the stamp.
- LMI support
See M&R options and M&R Laser Engraver for more information.
(These settings are only available as from the SOSET Typeset Gold 2.88 M&R version).
![]()
Hotkey
This option makes data entry easy and quick. When you select this option a list with pre-defined Hotkeys appears. You can add, edit and delete hotkeys in this sub menu. You simply enter often-used words and texts, in combination with a key or key-combination.
During text editing you just hold down the pre-defined key or key-combination plus arrow-up or arrow-down and SOSET will replace this entry with the pre-defined text.
The list of hotkeys is global list. You can enable or disable the use of hotkeys in Local Preferences in Typeset.
Be advised to use combinations of keys e.g.: @w for Washington, so unintentional use of the hotkeys is limited.
![]()
Typeface Overview
With this option you can print an overview of all available typefaces fonts. An example of a font is shown in the dialog box. It is possible to choose a selection of typefaces, to define a range of the fonts to be printed. You also can collate copies, in the print dialog, succeeding the typeface selection dialog.
![]()
Send Message
Communication is very important in the rubber stamp industry. In SOSET it is possible to send messages to users in the network. SOSET offers a very easy and efficient way to mail users, known in the User-table.
Just click the Send message option on the File menu, select the user(s) in the network you want to mail and enter the message. All SOSET software checks the mailbox and warns the logged user(s) when there is mail. When the user is not logged in, the mail remains in the box and will appear during next login of this user.
Mail in the mailbox can only be deleted by its user.
This option is only available in the SOSET Typeset Gold version!
![]()
Contact us in case you have any question or comment via our email